 |
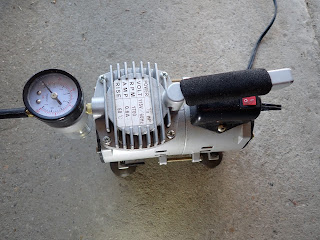
| Using this mini air compressor, I attempted building the mythical "$15 LS Priming Tool." |
There are videos floating out there about "The $15 LS Primer Tool" for priming General Motors "LS" family of engines. They are misleading because it doesn't cost a mere $15 for the tool. It's $15 for the weed sprayer used to contain the oil, but you have to buy everything else such as a fitting to connect compressed air to the sprayer, adapter that goes into the plug on the block and hoses.
Following is how I did the kit with a mini air compressor used for airbrushing.
First, you need the $15 sprayer which you can get from the South American Rainforest Company. Or maybe a local store has the same thing. Or you already have one and don't use it anymore, and therefore you are actually saving the $15!! You might get lucky and have all the stuff in your garage and don't need to buy anything at all, so you did it for free!!
The key thing is that you don't need a high capacity bottle because just a couple quarts of oil are needed to prime the engine. You just need a container that will hold pressure.
What you need:
- The sprayer
- An adapter to screw into the bottle for pumping in air (plus a drill and drill bit to make the hole)
- Teflon tape
- 1/4" hose (preferably clear) replacing the trigger assembly that comes with the spray bottle
- A fitting to go to the block in place of the oil pump cap
Once you get the bottle, you drill a hole for your air fitting of choice. This fitting could vary, so choose your hole wisely. Hahaha. Choose your hole wisely.
If you have compressed air, you could screw in a fitting to connect an air chuck, or you could screw in a Schrader valve or tire-valve-like fitting. (I thought about the latter because I have a really good tire inflator that gets power connecting to a car battery.)
Since I had one laying around, I drilled a hole in the bottle and screwed in a 1/8" Barb x 1/4" NPT male brass fitting after wrapping the threads with teflon tape.
 |
| I drilled a hole in the bottle and screwed in a small brass fitting. |
This was connected by a rubber hose to the small airbrush compressor.
 |
| Removing the coiled air hose from the compressor, this rubber hose went in place and connected to the brass barb on the spray bottle. |
I've had this compressor for 10+ years because I was going to get into plastic car models. That hobby never got off the ground, but this little air compressor worked for priming the first engine and installing valve springs (barely worked for the latter job but it's only a bad idea if it doesn't work).
Some of the Youtubers say a fuel pressure gauge needs to be installed on the bottle -- drill a hole, and screw the gauge into the bottle as done with the air fitting. But the little airbrush compressor I have maxed out at 40 psi while priming, so I don't think adding a pressure gauge is necessary if doing it this way.
The spray bottle already has a plastic coupler with the nozzle attached. Replace the trigger assembly and hose with a clear 1/4" hose.
 |
| The trigger assembly removed from the fitting. |
 |
| The trigger assembly is replaced with a clear plastic hose to verify oil is actually flowing. |
Next up, remove the oil pump plug on the driver's side of the block. This step is universally agreed so you can't skip it!
 |
| The plug on the passenger side of the block, easily removed witha hex socket. |
There are some variations on what adapter to put in the plug's place. Some Youtubers install an M16 to 1/8 NPT adapter that you need to thread another adapter on the female side so it will fit the clear 1/4" tube.
The way I did it was with an M16 P1.5 to OD 10mm barb adapter that screwed directly into the block and connected directly to the tube. Sort of.
 |
| The adapter screws into the block in place of the plug. |
The 1/4" clear hose was a little too small to attach to the nipple, but I made it work fitting a small piece of 3/8" rubber hose onto the adapter, plugging the clear tube in, and clamping it down.
 |
| Of course I didn't get a picture with the adapter screwed into the block, but this is what the connection looked like with a piece of 3/8" fuel hose and two small clamps. |
With my little airbrush compressor, I wasn't worried about high PSI bursting a hose off a connection or oil leaking.
I actually think this would work without any sort of compressor -- the hand pump would be adequate, but you'd have to manually pump to keep pressure, and it would take longer. With my priming kit, it took about five minutes to push two quarts of oil through.
 |
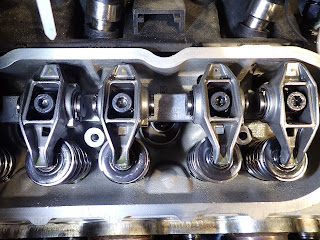
| The oil doesn't come gushing through the pushrods -- it's more of a trickle. You can see a small pool of oil collected on the top of each rocker arm. |
This was in my unheated garage in 40-degree weather, but I cheated a bit and kept the oil in the house before starting the priming process.
Again, the only real deviation is how you are going pressure air in the spray bottle, which dictates what adapter you use on the bottle.
Since I used a few things I already had in my garage, here's an estimated rundown of what this kit cost:
$15 - Weed sprayer
$10 - 1/4" clear tubing (had some leftover pieces)
$13 - Adapter that goes into the block
$7 - Brass fitting
$14 - 1/8" rubber hose (another leftover piece)
That comes to $59 for all the components not counting the airbrush compressor. Also not accounted for is the piece of 3/8" fuel hose and clamps to mate the adapter on the block with the clear tubing, because who doesn't have a piece of 3/8" fuel hose and small clamps laying around? Also teflon tape (I have three rolls for some reason).
 |
| The $15 LS Primer Kit (not all parts included) |
Disclaimer: As an Amazon Associate I earn from qualifying purchases.
Comments
Post a Comment